Monday 10 November 2008

Bedroom Turns Into a Kitchen

For the longest time, I´ve wanted a place to display all my rements. Then, at flickr, I saw a nice modern kitchen set on my friend Susanne´s photo stream. She was kind enough to help me get one and the process to turn my doll house bedroom into a cosy kitchen began.

Here is the original kitchen set


It was bright red and had background papers with pictures of food and dishes on it. Not really my cup of tea, so those had to go. Also, as most sets are, this too was far too low for FR dolls. So, I also decided to make a pedestal to increase the height of the set. First, it was just a piece of wood, but in the end that made it a bit too high. However, my first priority was to change that loud fire engine red.


This is the kitchen after a brown base coat. I covered the part I wanted to keep original with tape and news papers and sanded the surfaces to be painted with rough sand paper. This not only helps the paint to stick but also makes a wood grain like surface that increases the realistic feeling to this all too polished plastic.

The base coat was made with brown spray paint, but that was a grave mistake. Don´t use spray paint! It corrodes the plastic. Sigh. Even though I had covered the windows of the cupboard over the sink well with tape the spray paint corroded the plastic underneath too. So, now they have a effcet that makes them look awfully dirty. Well, its not like my own kitchen is perfectly clean either, so I won´t let it bother me. Still, I would not done it if I had known.

Finished:


After the base coating I use acrylic paints and a small brush to paint wood grain patterns to the brown surfaces. I also made some "marble" tiles from cardboard that I hot glued above the sink and stove. That warm marble looked kind of out of place first, so I toned the cupboard under the sink with same warm creamy tone.

I also build a proper pedestal from foam core. It is about 2,5cm high and painted white with acrylics. If you use a coarse brush and quite dry paint the brush strokes will give you a nice wood grain feeling. I also painted all the handles white and replaced the background cardboards with plain white ones. And now, I finally have a place for all my rements - and there is quite a bunch of them! ;)


Friday 22 August 2008

Her Grey Eminence Vanessa

This has nothing to do with my doll house, really, but I want to share this project with you anyway. It has, of course, still something to do with dolls, or a single doll more like - let me present Her Grey Eminence Vanessa!


This Vanessa doll is the first one in my FR collection. I bought the doll completely blank with not face or hair and transformed her into a complete and luxurious OOAK gift set. Its the first time, really, that I have even attempted anything like this, but I must admit there was something endlessly more satisfying in creating something this complete compared to mere separate phases of repainting, rerooting and sewing. A design of a doll where all those aspects of OOAK (One of a kind) doll making coming to together in a well planned look with hair, make up and wardrobe made just for this doll. It was quite like publishing a FR doll of my very own. I liked it.


The wardrobe of this doll celebrated the current fashion trends of grey and sheer. As presented in the picture above, the wardrobe includes three sets of clothing common to most FR girt sets that inspired my work.


My original inspiration was the business suit. I had acquired a small amount of the finest wool ever imaginable when I was interpreting for my spouses sister as we shopped for fabrics in China. What ever she bough I got a small provision - namely half a meter of every luxurious fabric!

This perfect grey wool was perfect for the suit. I used a figure adoring cut, that made the jacket a nightmare to make. This one is the third version, the first two ending up as momoko and MB clothing. The jacket and the pencil skirt are both fully lined and then hand applied with pearl coloured beads. I also made a matching clutch handbag and pearl bracelet to complete the look as well as simple silver bumps and a luxurious faux fur stole.


As thiss was suppose to be a gift set style wardrobe there had to be a long gown - even though I´m not a gown person at all. For some reason I just don´t like my dolls posing in evening gowns, instead I prefer them in something that could be worn on high street - but that is still far from casual! Ok, got carried away again, the gown. For the gown I chose a grey silk chiffon that obviously without any lining would be an outrageous thing for a real person to wear, but that is the whole point and fun of dolls - they can!


For the strategic places I used more beads for censorship. Well, its still obvious the gown covers all but hides nothing, but I suppose I´ll just have to create a character well suited for such questionable behaviour. ;) The fur stole made for the business suit works well with the sheer gown as well.


Normally the gift sets have lingerie as the third outfit, but I wanted this character to be of mature age and though a night gown prudent no matter how vague the morals of the person were - as Finnish maxim says: "Age does not arrive alone". So instead of bra and panties or sexy corsets I made a 20´s style sheer lace night gown with matching panties.


As before, the outfit was decorated with hand applied beads, but this time used in moderation - only scattered around the cleavage and sleeves. The tiny beads are almost invisible but yet give the gown that distinct feeling of luxury.


Vanessa was rerooted using KatSilk saran fibre in the mother of pearl colour called the "Opal Essence". The famous hairstyle was inspired by the FR " A Fashionable Life" Vanessa, that is considered the most beautiful Vanessa doll ever made by most FR collectors worldwide. I must say this hairstyle was a nightmare to make and I will never ever attempt it again.

I had set my mind upon it and tried without success for hours and hours until I got it looking like this. And this, mind you, is nothing even close to the AFL Vanessa´s perfect up do. First of all, the side part is on the wrong side. This is mainly because the doll I used had had a side part on thast side that was rooted for tight rerooting it might risha fractured "skull", so I made the decision to reroot the parting on the other side. Second, I just could not get the hair as tidy as the factory style on AFL Van. Just couldn´t. Impossible. Maybe I´m just bad at this or something. Anyway, if anyone ever askes me to do a commission with this hairstyle, I just say I´m not talented enough to do it. Sigh. :(


The face up was done, as usual, using fine artist acrylics and completed with faux lashes. HGE Vanessa has grey eyes, nude lips and some tiny age lines around her mouth and eyes. I wanted to paint a portrait of a woman well aged, but yet powerful and full of rigour. I will be writing her character profile when it comes to me, and it will be updated to my flickr "FR character profiles" set in:
http://www.flickr.com/photos/emiliacouture/sets/72157606266758910/


Friday 8 August 2008

The Bedroom

I started making this room ages ago but I wanted to write hear about it only when it was done. I call it the bedroom but in truth this room is maybe the most versatile space in the whole house. The white walls with plaster finish function very well as a soft light booth for photo shoots as demonstrated in the picture below:


So, lets get started shall we! The first thing I did was to cover the walls with plaster to give them rough texture. I used a hard brush and kept changing the direction of the strokes to make it more lively. The plaster alone would have been enough to make the walls white but it did paint them too with normal matte wall paints for more durable surface - plaster absorbs all the dirt.

Next, I cut strips of cardboard into floor boards and glued them in place. I left small cracks between them to give the floor feeling of old. I´ve always loved those huge wooden floorboards creaking when ever you step on them...


Next, I added few more strips of cardboard as foot boards framing the floor and painted the whole thing with the same colour of white.


At this point I had also made the doors, already presented in the post: The Hallway - chapter 2. Anyway, hare are some pictures of the doors in place. I bought the hinges and doorknobs from Eurominis and the doors are carves out of foamcore.


Now that the room itself was ready it needed some furnishings. I had already set my mid upon one photo I had seen in a Chinese interior design book - or more on feeling of the picture. White, ascetic, very little furnishings and the gorgeous futon four poster bed!


It took me a while to make the futon four poster bed I had been dreaming of but I think it was worth the bother! I did not want to make it as thin as the original bed, but ended up using thick bamboo as material. Well, I did have black bamboo available, but the sequence of the sections was not suitable for 1:6 scale, so I bought round wooden pole instead and made the sections with epoxy putty. The futon mattress is just cotton padding in a cotton cloth with typical futon stitching.


The flowerpot is re-ment and the rosewood pedestal is a souvenir from China.


I think my Tallis is looking sleepy between those comfortable cotton sheets!

The hallway - chapter 2

Here you can see the door from both sides. The dark wood art nouveau doors are from the hallway side and the white panel ones from the bedroom and bathroom sides. They are attached with small jewellery box hinges and the ornamental doorhandles with keyholes are from Eurominis.

I had originally planned a floor of zitan wood, that is to say the same wood the tea table allegedly is. I had already finished the floor, but then noticed that the table - which after all been the only furniture was the centre piece of the décor - vanished in it. So I ended up using chestnut instead. Besides, it gives the hallway more retro atmosphere as the almost black floor made it so much more modern. I want the whole house to have an old feel to it, with fine decoration, but still with a lingering air of neglect.


And below you will see the final version. Or almost final, since it still missing the lamp I´m suppose to do. And I´m thinking of placing a Gistav Klimpt painting on the wall...


I already have a lamp in mind for the hallway. But it might be too ambitions project for me to do since I´ve never made lamps before. Anyway, here is the inspiration picture:


I will keep you posted with my progress.

The Bathroom


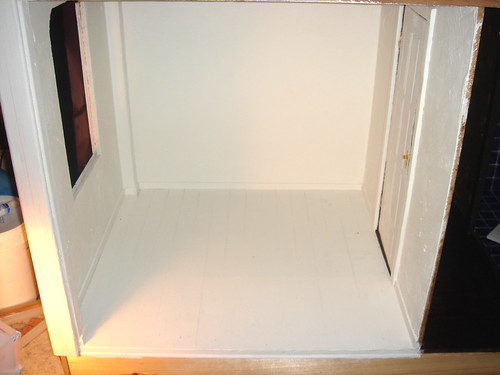
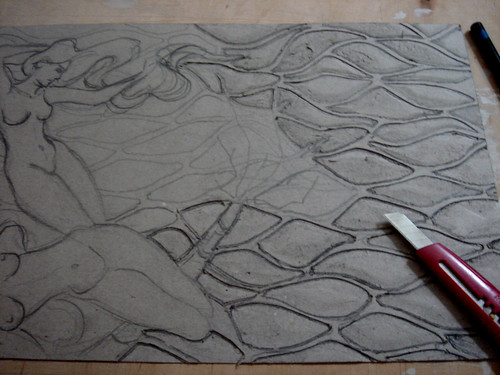
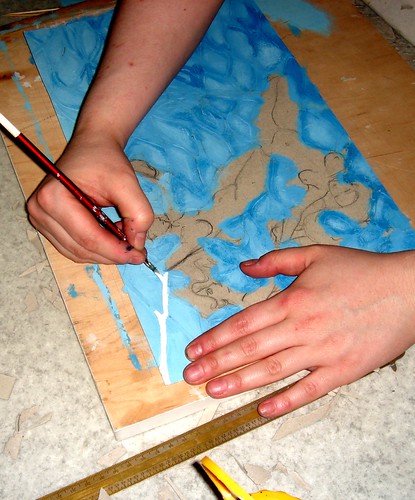
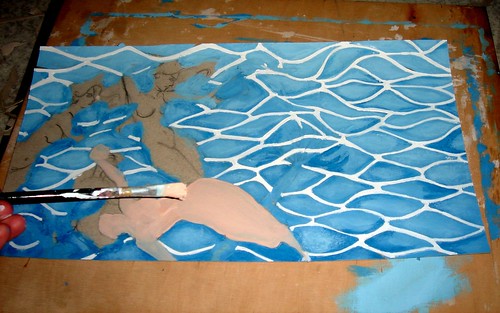
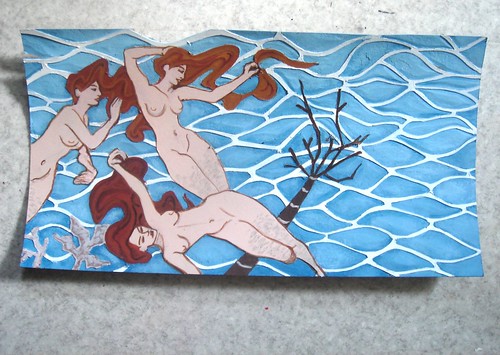
As I´ve told before, I got this doll house from my sister and she had already decided the place and size of the bathroom as well as started tiling is with blue ceramic tiles. As the main colour was decided for me I simply continued the theme with more blue, white for refreshment and gold for the feeling of luxury my picky dolls require. I have also explained, step by step, how I created the 
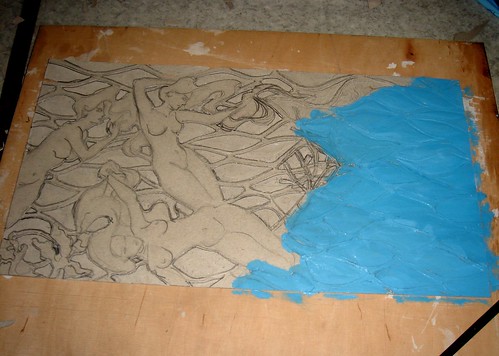
art nouveau style fresco on the bathroom wall. So now its time to take you thru the making of the bathtub, sink and the other finishing details of the room.

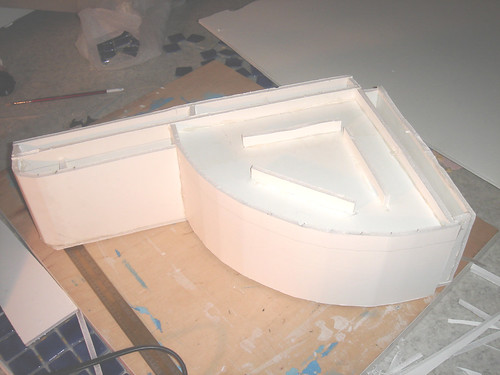
For the bathtub, I used my favourite material: foamcore. It is so easy to cut and glue with hot glue, not to mention loads of other qualities, that I recommend it to everyone. I have always had an fixation to those lion pawned tubs but for this one it seemed more suitable to make a build in tub like a jacuzzi to give it that utterly posh grandeur. In this picture the bathtub and a seat next to it are photographed from below showing the basic framework.


In the picture below the jacuzzi has already been covered with tiles (sorry, forgot to take pictures of the process again). The tiles haven´t been seamed yet and the element is completely removable from the room. For the tiles I did not have any tile glue, although I strongly recommend it. I was soon to notice that hot glue, even though it kept its hold well in the foamcore, did not stick at all to the ceramic tiles as could well accepted. I experimented with other glues I had at hand and wood glue functioned all right. It was the seaming putty that held everything together in the end.


Then my bathroom needed a sink. The problem with fashion royalty dolls is that all the furniture and stuff made for 1:6 scale dolls is always too small for them. So, instead of first trying to hunt down a nice sink and then configure it to proper size and heigh I decided to make one from the materials i had at hand. I had always though my make up powder box would make a great sink and I had just finished one too. Originally I intended to keep the lid with mirror too, but then the sink would have had to be so far away from the wall and take too much space. So, I cut off the oval lid with mirrors and all and patched the wholes with epoxy putty. The two component putty I use is Magic Sculpt. Its good stuff but too sticky, even though you can speed things up a bit by adding some talcum powder. Anyway, you can buy it in huge quataties instead of those tiny strips you get from hobby shops, which is good since I use it a lot!

So below, you can see the basic structure of the sink. I made a pipe with hot glue from foamcore again, covered it with the epoxy putty and just stack the powder box in place. Then I added a tap from Eurominis and its ready to be painted. Well, there was loads of sand paper used before that.


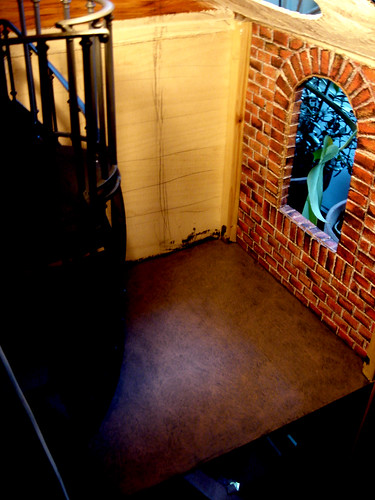
Jump forwards and below you can see the bathroom with the painted sink and the fresco in place. I have also added a gilded mirror on the wall. It was simple enough to make. Buy a nice post card size photo frame from a shop, cut in in half from the middle and fill in some epoxy putty in similar ornamental shapes until the size is right and paint it wild gold paint. Oh yeah, and cut a piece of mirror to a size you need too. Glass is easy enough to cut if you have the proper tool.


Almost forgot to mention that at this point I had also painted the seaming putty blue. I find the grey stuff really boring and average, but used it anyway since its the cheapest. For a real bathroom you´d of course just buy the right colour since this paint is not going to be water proof.


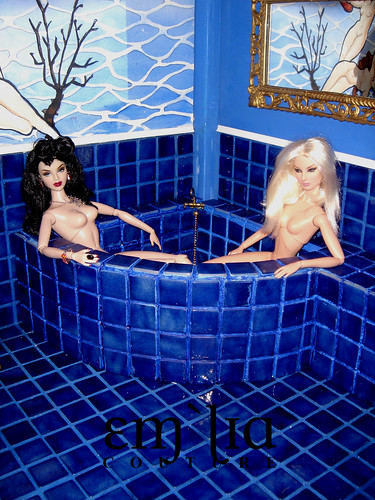
And here they are, my dolls, already using the bathroom even though its still missing lots of things. I have now added white boards above to frame the tiling. I´m not sure yet, but should I paint them blue too? well, we´ll see.

Lucretia and Elizabeta can´t wait their turn, so they just gram in the tub together.


In the picture below you can see the golden mirrors more clearly. The bigger one has nice and sharp ornament frame on the sides but in the middle you can see the part I have made to mimic the pattern. Not perfect or even near it, but it will have to do. ;)

I added the second smaller mirror above to sink just to be able to take this sort of photos! ;D


Well, the bathroom is almost finished now. It still lacks electricity and I haven´t even started making lamps yet, but the materials I ordered have just arrived so it shouldn´t be for long now. I have also planned huge white baroque ornaments to frame the sealing, but the school is starting soon so I will not have as much time in my hands anymore...

Monday 7 July 2008

The Monastery Stone Floor

As for the floor of my library, I wanted something special and old. The oldest libraries of Europe were all monasteries where monks copied the ancient books by hand in the echoing halls. To preserve that notion of history into my own library I chose those stone tiles worn by centuries as my inspiration.


I painted the floor with same shades I will be using on the tiles to lessen the contrast between the tiles and the floor between them. The paint has three layers: black, dark grey and brick brown beaten together with a dry brush.


Forgot to take pictures of the phases in between again, sorry. What I did before this was cut the tiles out of cardboard and carve some cracks and ancient tombstone markings on them. I used the same materials, tools and methods as in the water nymph fresco earlier, so you can check the process from that post. I could not fit all of the text from my inspiration picture to the main stones, but for me the visual effect is much more important than the meaning of the tomb markings on the stone - actually I though it better to leave out the name of the buried anyhow, not really politicly correct to have a historical person buried under your library is it?


The secret of painting stone like surfaces is to paint layers after layers of different shades - three or four layers ought to do it. So, over the dark grey I added brick brown with a very dry and hard brush to give it texture and highlight the cracks in the stone.


This is the third of fourth layer, if I remember correctly. Could even be the fifth, I´m not sure. I have been toning the same shade of brick brown lighter with white after every phase still using a very dry brush to beat the colour to the "stone". You can see how the uneven texture of my early carving becomes more visible and how the cracks and markings on the stone pop out.

To finish a texture and feeling of stone worn over centuries I add gloss varnish for the smooth surfaces careful not to let any lacquer slip to the crumbled parts that need to keep their rough feeling. Two layers of lacquer give the "stone" depth and more natural appearance.


Here it is, my library, the spiral staircase, red brick wall and monastery tile floor all finished! However, the library itself is not finished as one might guess, for what is a library without books?
Now that everything else is done I can finally start making the bookshelves that will cover the wrest of the walls. The wall on the left side, where the doorways are located will be covered by a face bookshelves; the back wall, on the other hand, will hold real ones reaching up from floor to high sealing. There will be a sliding ladder of course - how else the dolls could reach their books? And the hard part is, I want the books to be real books with pages and leather covers with golden capitals. The mere though makes me sigh dreamily, but then again, its going to be a hell of a lot of work. Happily, Juhana has agreed to help me on this, but knowing him the books he´ll be making are all going to be some Lovecraft related occult nonsense, but no matter, I don´t think my dolls can read anyhow. ;)

The Spiral Staircase

Now then, the library. One of those perfect, classic, dusty, dark, ancient libraries with green table lights and iron spiral staircases. How could it not have a staircase, that´s so essential it´s simply given to have one!

I might be fairly good with my hands, but building a spiral staircase from scraps felt like too much of a brain wrecking idea. I had seen a barbie play set with 1:6 scale stairs in W-club forum and hunted down the same set on ebay. My though was not to keep the whole barbie house with two floors, but only use the stairs and the railings and let the seller keep the wrest. Luckily, I had also asked her to send me the foot- and head boards of the bed, that I cut into pieces and used for supporting the new balcony I made from foam core.


The stairs are put together from several pieces so I used putty to fill all the seems.


After the putty had dried over night I sanded the surfaces and painted everything black with acrylics paint. This must have been the easiest part of the whole house, which is funny because I thought it would be the most difficult one. Making such a staircase myself would´ve been a real bother. ;)

The Water Nymphs - a Bath Room Fresco

I had originally planned the bath room to have a fresco on its wall but it was suppose to be the Botticelli´s Venus. However, I started to feel that particular piece of art was too much of a cliché. So, browsing the flickr for inspiration I found this Art Nouveau fresco, that I considered quite perfect - especially since the house was going to a be from that era.

This time I remembered to take photos all thru the process. Hopefully this can even serve as a sort of an tutorial (doubt its usefulness, though.) The first phase was to do a rough sketch to a piece of cardboard and then carve the form with a Stanley knife.


The second phase was to paint the water in the background of the picture. For this I mixed white acrylics paint toned with preussian blue watercolour.


Next I painted the uplifted lines white. This will create a nice feeling of water with the light reflected broken from the waves.


The fourth phase was to paint the skin tones of the water nymphs.


Here I am painting the background tones for the nymphs´ hair flowing free in the water. Every one of the three had a bit different shade of hair varying from maroon to okra.

These were the shades of colours I used for the painting. Acrylics white mixed in with preussian blue, brown, red and okra watercolours.


In this final phase I have added all the details: The water plants, outlines of the bodies, curls of their hair. I am not yet sure will I have to tone the water darker in some parts to make it fit better with the bath room tiles of darkest preussian blue, but that will be left for later.